Cosplay is a fun way to express your love for your favorite characters or fandoms, but it can also be an expensive hobby. That’s where craft foam comes in!
This versatile material has many benefits that make it perfect for cosplay creations. In this article, we’ll explore what craft foam is and how you can use it in your next cosplay project.
The Versatility of Craft Foam in Cosplay
Craft foam, also known as EVA foam, is a type of plastic foam that comes in sheets of various thicknesses and colors. It’s often used for arts and crafts projects because it’s lightweight, durable, and easy to work with.
In recent years, however, cosplayers have discovered the benefits of using craft foam to create intricate costumes and props. One of the primary advantages of using craft foam is its versatility.
It can be shaped into almost any form imaginable with just scissors or a heat gun. Whether you’re creating armor for a warrior character or crafting accessories like wings or horns, craft foam can be molded into any shape you need.

The Benefits of Using Craft Foam for Cosplay
In addition to its versatility, there are several benefits to using craft foam for cosplay. First and foremost is affordability – compared to other cosplay materials like thermoplastics or resin casting materials – craft foam is relatively cheap while still providing excellent results.
Another benefit of working with craft foam is that it requires minimal equipment; all you really need are scissors or a utility knife plus some glue (and optionally a heat gun). Even better – these basic tools are easy to find at your local hardware store or online retailer.
– perhaps the most significant advantage– working with EVA foam doesn’t require extensive training or experience. Unlike other cosplay materials which may require specialized tools such as vacuum formers or metal-working equipment that take time and practice to master, the basics of working with foam can be learned in a single afternoon.
Craft foam is a versatile and affordable material that has become increasingly popular in cosplay communities worldwide. Whether you’re new to cosplay or an experienced veteran, there are many benefits to incorporating EVA foam into your costumes and props. So go ahead; embrace your creativity, grab some craft foam sheets, and get started crafting!

Materials Needed
Craft foam is a versatile material that allows you to create intricate designs and shapes for your cosplay costumes. In order to work with craft foam, there are several materials you will need.
Foam Sheets
The first essential material for working with craft foam is, of course, the foam sheets themselves. Craft foam is available in a variety of colors and thicknesses from most craft stores or online retailers.
When selecting your foam sheets, keep in mind the type of cosplay project you will be working on. Thicker foam sheets may be better suited for armor pieces, while thinner sheets may work better for smaller props.
Scissors
In order to cut your craft foam into the desired shapes and sizes, you’ll need a good pair of scissors. It’s important to use sharp scissors that can easily cut through the thick material without leaving rough edges. To prevent unwanted jagged edges, consider investing in a pair of precision scissors specifically designed for cutting craft materials.
Glue
Next up on your list should be glue! There are many types of glue that can work well with craft foam including hot glue, contact cement or E6000 adhesive.
Hot glue is quick and easy to use but it tends to dry quickly which means you have less time to adjust pieces once they’re glued together. Contact cement takes longer to dry but it creates a strong bond between the pieces once it’s set.
Heat Gun (Optional)
A heat gun can be used when working with thicker foam sheets that require more manipulation or shaping than simple cutting can provide. Heat guns allow you to soften the material so that it becomes more pliable which means it can be molded into different shapes and forms.

Paint
Paint is an important accessory when it comes to crafting with foam. Without paint, your craft foam creations are likely to look bland and unfinished.
Be sure to choose a paint that is suitable for use on foam, such as acrylic paint. You can also experiment with different finishing techniques like adding texture or weathering with spray paints. We’ve written a full guide to painting foam for cosplay.
Working with craft foam requires a variety of materials from the basic starter kit like scissors, glue and foam sheets; all the way up to more advanced materials like heat guns and textured paints. Whether you’re just starting out or have been working with craft foam for years, it’s important to have the right tools on hand so that you can create amazing cosplay costumes!
Basic Techniques
Cutting and Shaping Craft Foam with Scissors or Heat Gun
One of the first things you’ll need to do when working with craft foam is cut it to size. The easiest way to do this is with a pair of scissors. However, keep in mind that foam can be thick and tough, so you may need to use some elbow grease.
If your scissors get dull after extended use, switch to a new pair or sharpen them. If you want more precision when cutting craft foam, you can use a heat gun.
A heat gun will soften the foam just enough for it to be easily cut using a scalpel or X-Acto knife. This is especially useful for creating intricate designs or curved shapes.
Gluing Pieces Together to Create a Larger Structure
Once you have your pieces cut out, it’s time to start piecing them together. The easiest way to do this is by using hot glue.
Apply hot glue on one side of the foam and press it against the other piece that needs attaching. When gluing pieces together, make sure you’re only putting glue on areas where they will connect; otherwise, excess glue might ruin the surface texture of your project.
A good tip is to start from the bottom layer and work your way up. This allows you to see how each layer connects before moving on another part of the project.
Sanding Down Rough Edges for a Smoother Finish
After gluing pieces together, chances are there will be rough edges that need smoothing down for a clean finish. Sandpaper works well for this task; just rub on sandpaper until all rough edges disappear. If you’re looking for an even smoother finish, try using an emery board instead of sandpaper – these typically come in finer grits than sandpaper does and can smooth down rough edges and bumps quite nicely.
Another tip is to use a Dremel tool with a sanding attachment to sand down edges in hard-to-reach places. This technique is useful for those who want a more precise finish or have intricate designs.
Advanced Techniques
Tools of the Trade
When it comes to advanced techniques for working with craft foam, having the right tools can make all the difference. A Dremel tool is a versatile tool that can be used to add texture and detail to your craft foam creations. Depending on the attachment you use, a Dremel can be used for everything from sanding down rough edges to carving intricate designs.
Another tool that can be useful when working with craft foam is a wood burning tool. This tool uses heat to burn patterns into the surface of your foam, creating intricate designs and textures that are sure to impress.
Layering for Depth and Dimension
Layering pieces of craft foam is a great way to add depth and dimension to your cosplay creations. Start by cutting out several pieces of foam in different shapes and sizes. You can then stack them together and glue them in place using a strong adhesive like E6000.
To create even more depth, you can also carve into the layers using your Dremel or wood burning tool. This will create unique textures and patterns that will really make your cosplay stand out.
Heat Shaping Techniques
Heat shaping is another advanced technique for working with craft foam that can help you create curved shapes or intricate designs. To get started, you’ll need a heat gun or other heating element like an iron.
Start by heating up the area of foam you want to shape until it becomes pliable. You can then use your hands or other tools like a dowel rod or rolling pin to bend or shape the foam into any shape you desire.
Be careful not to overheat the foam as it could melt or become damaged. Practice on small pieces of scrap material first before attempting more complex shapes on larger pieces.
Creative Applications
One creative application of advanced craft foam techniques is creating realistic-looking armor or weapons for cosplay. By using layering, heat shaping, and sanding techniques, you can create pieces that look like they are made from metal or other materials.
Another application is creating intricate designs and patterns on costumes or props. Whether it’s carving elaborate scrollwork into a sword or adding texture and depth to a set of wings, the possibilities are endless with craft foam.
Painting and Finishing Touches
Acrylic Paints
Once you have your craft foam cosplay piece cut, shaped, and glued together, it’s time to start painting. While spray paint is an option, acrylic paints are a great option for beginners because they dry quickly and can be found at most craft stores. Once you have your acrylic paints in hand, it’s time to start painting.
Begin by applying a base coat of paint with a brush or sponge. Make sure the paint is evenly applied and cover all the surfaces of the craft foam piece.
If you need to apply multiple coats, let each coat dry thoroughly before adding the next. After applying the base coat(s), add any details or designs with smaller brushes or sponges.
Take your time with this step as it can make a significant difference in the final product. Be sure to blend colors well and clean up any mistakes as you go.
Weathering
Weathering is an excellent way to add character and dimension to your craft foam cosplay piece. The goal is to make it look more realistic by adding elements such as dirt, rust, or wear-and-tear marks.
Start by mixing black acrylic paint with water until it’s about a 50/50 mixture. Then use a brush or sponge to apply this mixture onto areas that would typically get dirty or worn out (such as corners).
Be sure to wipe off excess on areas that wouldn’t typically see much weathering (like flat surfaces). Next, add rust effects using shades of red brown and orange acrylics if your cosplay involves armor pieces like gauntlets or helmets.
This technique can be achieved by layering different colored paints on top of each other while allowing each layer of color dry completely before moving on. You can add wear-and-tear marks using sandpaper after finalizing all paintwork.
Use rough-grit sandpaper to create scratches, dents, and other imperfections to the paint job. The result is a weathered and battle-tested look that can add to the realism of your cosplay piece.
Metallic Accents
Adding metallic accents is perfect for armor or weapons. To achieve this effect, you need some acrylic metallic paints in silver, gold, copper or bronze.
You can use these paints for the entire surface of your craft foam piece or just as accents. You can use a brush or sponge to apply the metallic paint on top of the base coat using thin layers that dry completely before adding additional coats.
This will help build up an even and shiny finish. Once you have achieved your desired level of shine on your craft foam piece (such as a helmet), let it dry completely before wearing it for any cosplay event!
Craft foam is an excellent material that has many uses in cosplay. Painting and finishing touches are essential steps in achieving a great finished product to show off at conventions while also enhancing realism and detail.
Acrylic paints are great for beginners while also being versatile enough to work with more advanced techniques like weathering and metallic accents that make each craft foam cosplay item unique. Don’t be afraid to experiment with different textures and designs when painting your craft foam pieces; after all, every detail counts!
Examples of Cosplay Uses
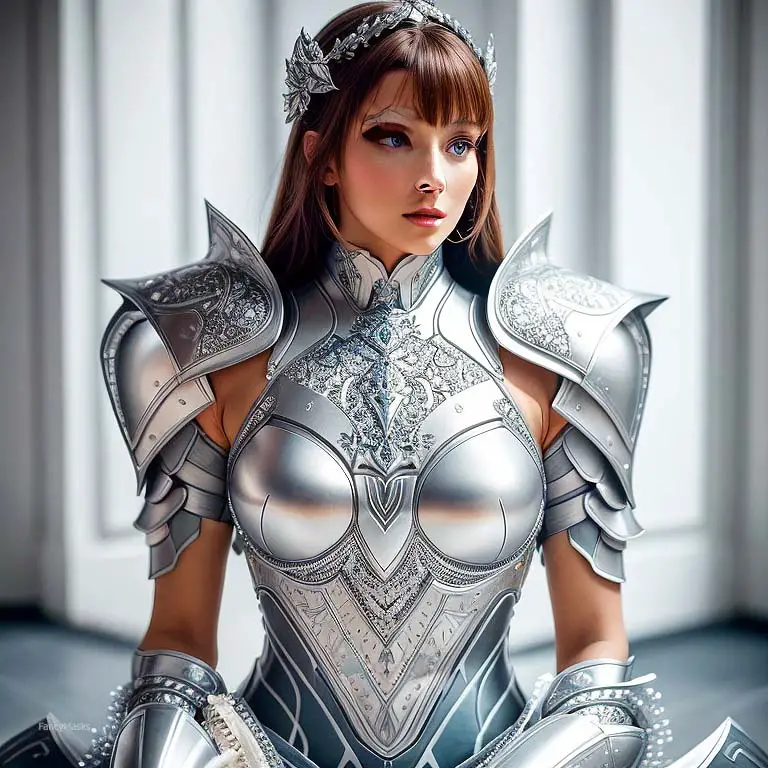
From Armor to Props: The Versatility of Craft Foam in Cosplay
Craft foam is a go-to material for creating cosplay costumes because of its versatility and affordability. It can be easily cut, shaped, and layered to create complex designs.
One popular use of craft foam in cosplay is for armor pieces. Craft foam can be crafted into intricate chest plates, shoulder pads, or gauntlets that look like metal but are much lighter and easier to move around in.
Another great example is creating props such as weapons or helmets with foam that can be painted and customized to fit the character’s design. When it comes to choosing the right thickness and density of foam, there are several factors to consider.
Thicker foam sheets will provide more durability for larger structures such as armor pieces or helmets while thinner sheets work better for small details like emblems or accents on a costume. Density plays a role in how sturdy the final product will be – higher density foam will result in a stronger structure but may also be heavier.
Craft Foam Costumes: A Beginner’s Guide
If you’re new to using craft foam for cosplay, it’s best to start with simpler designs before diving into more complicated builds. One popular beginner-friendly use of craft foam is creating shields, as they only require basic cutting and gluing techniques.
Another great starting point is crafting accessories such as belts or cuffs out of craft foam. These items are smaller in scale which makes them easier to work with and perfect for experimenting with different techniques such as adding texture.
Conclusion
The Sky’s the Limit When It Comes To Using Craft Foam In Your Cosplay Creations!
Craft Foam is an incredibly versatile material when it comes to cosplay creation. Its affordability and ease-of-use make it an excellent choice for both beginners and experienced cosplayers alike. By following the basic techniques of cutting, shaping, and gluing, you can create a wide variety of costumes, props, and accessories that look great without breaking the bank.
So why not give it a try and see what amazing creations you can come up with using craft foam? The possibilities are endless!